|
|
Post by Larry Madsen on Nov 18, 2020 13:02:26 GMT -5
I received a couple of very gracious and complimentary responses on another thread. Thank You Tequila Rob and Grizbear-NJ
If there is interest I could post a *from the ground up* showing of how the room came to be and what is included in the process that you can't see now that it's complete.
If nothing else it might be entertaining to some and possibly helpful to others.
Let me know what interest there is. I don't want to just start posting stuff if there is no interest, because it will include a lot of PICs that will need to be moved to hosting, but I will happily do it.
|
|
|
|
Post by steveb63 on Nov 18, 2020 13:35:09 GMT -5
In the middle of my build.
Would be great to see others ideas and solutions.
|
|
|
|
Post by Ricketi on Nov 18, 2020 14:44:13 GMT -5
I am interested!
|
|
|
|
Post by Larry Madsen on Nov 18, 2020 15:36:34 GMT -5
Ok guys, I'll go with it. I'll start at the very beginning ... the ground. This is the beginning ... dirt.  1 Area to be built 1 Area to be built by Larry Madsen, on Flickr A this point I needed to raise the elevation a few inches. I had broken out a concrete walkway in the front yard and used the pulverized chunks to spread across the new build area.  DSC_0672 DSC_0672 by Larry Madsen, on Flickr This is after compaction of the entire area pictured above  DSC_0674 DSC_0674 by Larry Madsen, on Flickr Forms and grade set.  DSC_0678 DSC_0678 by Larry Madsen, on Flickr Rebar galore.  DSC_0681 DSC_0681 by Larry Madsen, on Flickr Concrete poured.  DSC_0685 DSC_0685 by Larry Madsen, on Flickr Forms gone. Some additional flat (concrete) work to assist drainage in back and stucco off that back wall.  DSC_0716 DSC_0716 by Larry Madsen, on Flickr Rear wall with sheathing, bathroom window gone and that 8' window has had a new header inserted above and the section is prepped to be removed later.  DSC_0726 DSC_0726 by Larry Madsen, on Flickr OK now we are above ground.  |
|
|
|
Post by Larry Madsen on Nov 18, 2020 15:46:15 GMT -5
One intention I had was to have no windows to the north or east ... That is the two walls you see here. To the north (right side of PIC) my side yard is about 15 feet to the wall. Another six feet beyond the wall you are onto Flamingo Road. The room is pretty darn close to a major city street, thus my desire to have no windows toward the street. These walls are also 2 X 6 construction allowing thicker insulation.  DSC_0864 DSC_0864 by Larry Madsen, on Flickr All the windows and doors to meet code on egress and natural light/ventilation are here facing the patio to the south.  DSC_0868 DSC_0868 by Larry Madsen, on Flickr |
|
|
|
Post by Larry Madsen on Nov 18, 2020 15:55:49 GMT -5
Half inch sheathing (shear panels) cover the entire exterior of the constrcution.  DSC_0878 DSC_0878 by Larry Madsen, on Flickr Looking in from the patio. The new roof structure is creating that vaulted ceiling.  DSC_0880 DSC_0880 by Larry Madsen, on Flickr |
|
|
|
Post by Larry Madsen on Nov 18, 2020 16:04:36 GMT -5
One of my buddies helped me with the exterior finishing. Due to the nature of this room he recommended we use an industrial type finishing system. That system is referred to as EIFS (Exterior Insulation & Finish System). It begins with DensGlass. This is essentially sheetrock with a fiberglass coating on it. It's the base on which the remainder of the EIFS system will attach.  DSC_0882 DSC_0882 by Larry Madsen, on Flickr the DensGlass is sealed much like you would tape sheetrock. Then a coat of a synthetic (mortar like) paste is applied and 2" thick sterofoam panels are adhered to it.  DSC_0893 DSC_0893 by Larry Madsen, on Flickr The foam is shaved to a perfect smooth running surface.  DSC_0894 DSC_0894 by Larry Madsen, on Flickr The foam is then coated with more of the synthetic mortar and has sheets of fiberglass mesh pressed into that mortar. Once that sets up more mortar can be applied and a final finish texture can be set.  DSC_0895 DSC_0895 by Larry Madsen, on Flickr With this completing the exterior finish we have an outer surface beyond the studs: 1/2" sheathing, 1/2" DensGlass, 1/4" layer of mortar, 2" thick foam, 3/8" mortar and fiberglass mesh, then a final 3/8" coat of mortar and finish. Over-all this exterior coat is close to 4" thick. |
|
|
|
Post by Larry Madsen on Nov 18, 2020 16:24:11 GMT -5
To the inside. Here we have R-19 insulation all around and up top. Recessed LED lighting in the ceiling.  DSC_0909 DSC_0909 by Larry Madsen, on Flickr Looking back toward the patio end.  DSC_0910 DSC_0910 by Larry Madsen, on Flickr With insulation and electrical in place I could start covering things up. The next layer is 1/2" "sound board". These are relatively soft, fibrous panels designed to absorb sound. These go right over the studs.  DSC_0912 DSC_0912 by Larry Madsen, on Flickr |
|
|
|
Post by Ricketi on Nov 18, 2020 16:35:54 GMT -5
Nice work! Seems very well sound proofed.
|
|
|
|
Post by Larry Madsen on Nov 18, 2020 16:41:35 GMT -5
Next up, 5/8" sheetrock all around. The uncovered area around the window will be removed creating access to the house.  DSC_0913 DSC_0913 by Larry Madsen, on Flickr Looking back toward the patio, door and windows  DSC_0915 DSC_0915 by Larry Madsen, on Flickr Taping it up.  DSC_0917 DSC_0917 by Larry Madsen, on Flickr French doors and windows made it into place.  DSC_0924 DSC_0924 by Larry Madsen, on Flickr With the room sealed and insulated, I could now open it up to the house. To meet code I had to heighten and widen this opening beyond the width and height that old window was. That wall need to have an opening of a size larger than half of the wall surface it is in (on the existing bedroom side).  DSC_0925 DSC_0925 by Larry Madsen, on Flickr Add some paint. It looks pink in the PIC, it's actually a brownish beige ... ceiling is white.  DSC_0933 DSC_0933 by Larry Madsen, on Flickr Color is a lot closer in the PIC below.  DSC_0934 DSC_0934 by Larry Madsen, on Flickr |
|
|
|
Post by Larry Madsen on Nov 18, 2020 16:54:14 GMT -5
At this point these exterior walls are the four inches of exterior skin, 5 1/2" of insulated frame construction, 1/2" sound board, 5/8" sheetrock. They are close to and maybe are 11" thick. I do not hear much road noise at all in there and sound does not escape in any substantial way either.
At this point though, there was that hollow echo of an empty room.
|
|
|
|
Post by Larry Madsen on Nov 18, 2020 17:03:35 GMT -5
Next up, the elevated platform. I marked it out with tape to get the size and shape where it needed to be.  DSC_0942 DSC_0942 by Larry Madsen, on Flickr It's just a 2X4 frame structure  DSC_0948 DSC_0948 by Larry Madsen, on Flickr I built these channels into the structure to accommodate 4" vinyl conduits. These to assist in running wires from front to back of the platform.  DSC_0952 DSC_0952 by Larry Madsen, on Flickr The structure was then packed with insulation to deaden any extra curricular noise it might produce.  DSC_0954 DSC_0954 by Larry Madsen, on Flickr Then it's covered with 1" tongue and groove subflooring. I put this custom front edge molding on it  DSC_0984 DSC_0984 by Larry Madsen, on Flickr Some black carpet, paint, tile on the floor, curtains from Lowe's and we have the basis of a Music Room.  DSC_0994 DSC_0994 by Larry Madsen, on Flickr That hollow echo is now gone.   DSC_0993 DSC_0993 by Larry Madsen, on Flickr |
|
|
|
Post by FlyonNylon on Nov 18, 2020 17:17:34 GMT -5
Totally awesome! Looking forward to more pics.
🤙
|
|
|
|
Post by Larry Madsen on Nov 18, 2020 17:22:41 GMT -5
Nice work! Seems very well sound proofed. Thanks Ricketi. It is very good on the sound-proof aspect. It requires a pretty big and loud truck of motorcycle for me to hear it in at all inside the room. None of the "normal" street noise makes it into the room. |
|
|
|
Post by ninworks on Nov 18, 2020 17:23:06 GMT -5
Very nice Larry. That's a big project.
|
|
|
|
Post by Larry Madsen on Nov 18, 2020 17:32:31 GMT -5
Totally awesome! Looking forward to more pics. 🤙 Thanks FlyonNylon. There will be a few more |
|
|
|
Post by Larry Madsen on Nov 18, 2020 17:36:44 GMT -5
Very nice Larry. That's a big project. Thank You ninworks. It was that indeed. This was actually Phase 3 of the much bigger project. Phase 1 started in January of 2010 and ran through Phase 2 then on until the Spring of 2016 when Phase 3 was completed. I'll admit, when I started I had no idea if I would ever make it to Phase 3. Each phase was planned to completion so that if the next Phase never happened the house was OK at each end point. |
|
|
|
Post by Larry Madsen on Nov 18, 2020 17:46:35 GMT -5
As one might guess, Queenie decided she needed her portion of my new room. Being the wonderful guy I am ... This is Queenie's corner. Little sofa, tables made from wood scraps I had hanging around. Nice silk like table covers to hide the fact that they are made of scraps. We put in wood shutters to match the shutters we had installed in the living room after a prior Phase of the remodel. Here you can also see the sound panels (up high) I made with extra carpet I had after carpeting the raised platform. I honestly don't know how effective they are, but there they are anyway. I purchased some metal decor to dress them up a bit  DSC_1110 DSC_1110 by Larry Madsen, on Flickr |
|
Ayns
Wholenote

Posts: 767
|
Post by Ayns on Nov 18, 2020 18:05:51 GMT -5
Very, very cool Larry |
|
|
|
Post by Larry Madsen on Nov 18, 2020 18:13:09 GMT -5
Very, very cool Larry Thanks Ayns |
|
|
|
Post by Larry Madsen on Nov 18, 2020 18:22:03 GMT -5
From here on it's mostly getting it set up for use. This is my Computer Station. It's upgraded a bit now with a Focusrite interface and a pair of Yamaha HS8 monitors. The bar table there was trash from a neighbor. The base is cast iron and solid. I removed the beat up top and built another ... again with wood scraps I had around.  DSC_1115 DSC_1115 by Larry Madsen, on Flickr Several wall and corner shelves to handle "stuff" storage.  DSC_1008 DSC_1008 by Larry Madsen, on Flickr  DSC_1007 DSC_1007 by Larry Madsen, on Flickr  DSC_1006 DSC_1006 by Larry Madsen, on Flickr |
|
|
|
Post by Ricketi on Nov 18, 2020 19:02:23 GMT -5
I'm jealous , I have a 10' x10' area for my music room. My sons old room, Lol
|
|
|
|
Post by Larry Madsen on Nov 18, 2020 19:18:32 GMT -5
I'm jealous , I have a 10' x10' area for my music room. My sons old room, Lol This room is about 14' X 21' |
|
TBird
Wholenote
Posts: 298
Formerly Known As: greg1948
|
Post by TBird on Nov 21, 2020 7:45:22 GMT -5
Count me jealous too! That is amazing, Larry. You obviously are skilled in construction as well as music. Is this just for yourself or are you going into business with the studio?
|
|
|
|
Post by Auf Kiltre on Nov 21, 2020 8:23:43 GMT -5
Love it.
|
|
|
|
Post by Leftee on Nov 21, 2020 10:33:46 GMT -5
It is extremely excellent!
Love Queenie’s corner. The room needed that.
|
|
|
|
Post by Larry Madsen on Nov 21, 2020 18:15:40 GMT -5
Is this just for yourself or are you going into business with the studio? I built it with the idea of doing more with music than I have in the past . I included thinking it would be nice to have folks over for some fun times in there, though I have never really played with others in the past. I have had a couple of pro musicians I know in the room and they have thought it would be a great rehearsal studio ... I realize it would and I've let them know I would be fine with that. The room gives me a place for my music stuff. I've never had a special designated place for music. In some ways it gave me license to get more stuff. Queenie might say that's the "sick" part of it. I recently put in a four channel PA system and mics. I'm set up for basic simple recording. I really just need to spend more time in there doing things, improving my skills and my relationship with music. Lately I've been working a bit with my Warmoth G5 bass. |
|
Grizbear-NJ
Wholenote
"I'll do the BEATING around here"
Posts: 217
Age: 71
|
Post by Grizbear-NJ on Nov 22, 2020 1:03:29 GMT -5
Larry; after seeing the photo evolution and the detail you put into that room, I am even more impressed than before. From what I can see, you incorporated more acoustical innovation's than a professional recording studio. Well done my friend!
|
|
|
|
Post by roly on Nov 26, 2020 6:51:39 GMT -5
Very nice work!!!
Not something that could be done up here this time of year.
|
|
|
|
Post by Larry Madsen on Nov 26, 2020 11:28:07 GMT -5
Thanks all. This is how I trimmed out the openings in the floor front and rear to access the conduits. It's just ABS fittings from the hardware store. I cut the holes in the platform then after the carpet was installed I cut the holes through the carpet. Memory tells me these fittings are threaded. The holes are tight enough fit that the fitting screws right down in snuggly and stay put. They are hardly noticeable, but they sure keep the wiring issue out of the way..  DSC_2364 DSC_2364 by Larry Madsen, on Flickr I wanted my PA controls up for easy access.  DSC_2361 DSC_2361 by Larry Madsen, on Flickr So I constructed this cabinet. It holds the amp, has a tray up top to put stuff. It has a rim all around so things can't fall off the edge ... or god forbid a drink spills it's contained. The two large openings below make for good out-of-the-way storage spaces and as you might guess are the exact size to hold the two PA monitor speakers should I ever need to pack it up.  DSC_2360 DSC_2360 by Larry Madsen, on Flickr The two 12" monitor speakers live out on the tile floor in front of the platform. They don't take up any space on the raised platform and don't get in the way of travel across the tile floor either. If you look closely you can see they sit on a small riser base bringing them up to the height of the platform. 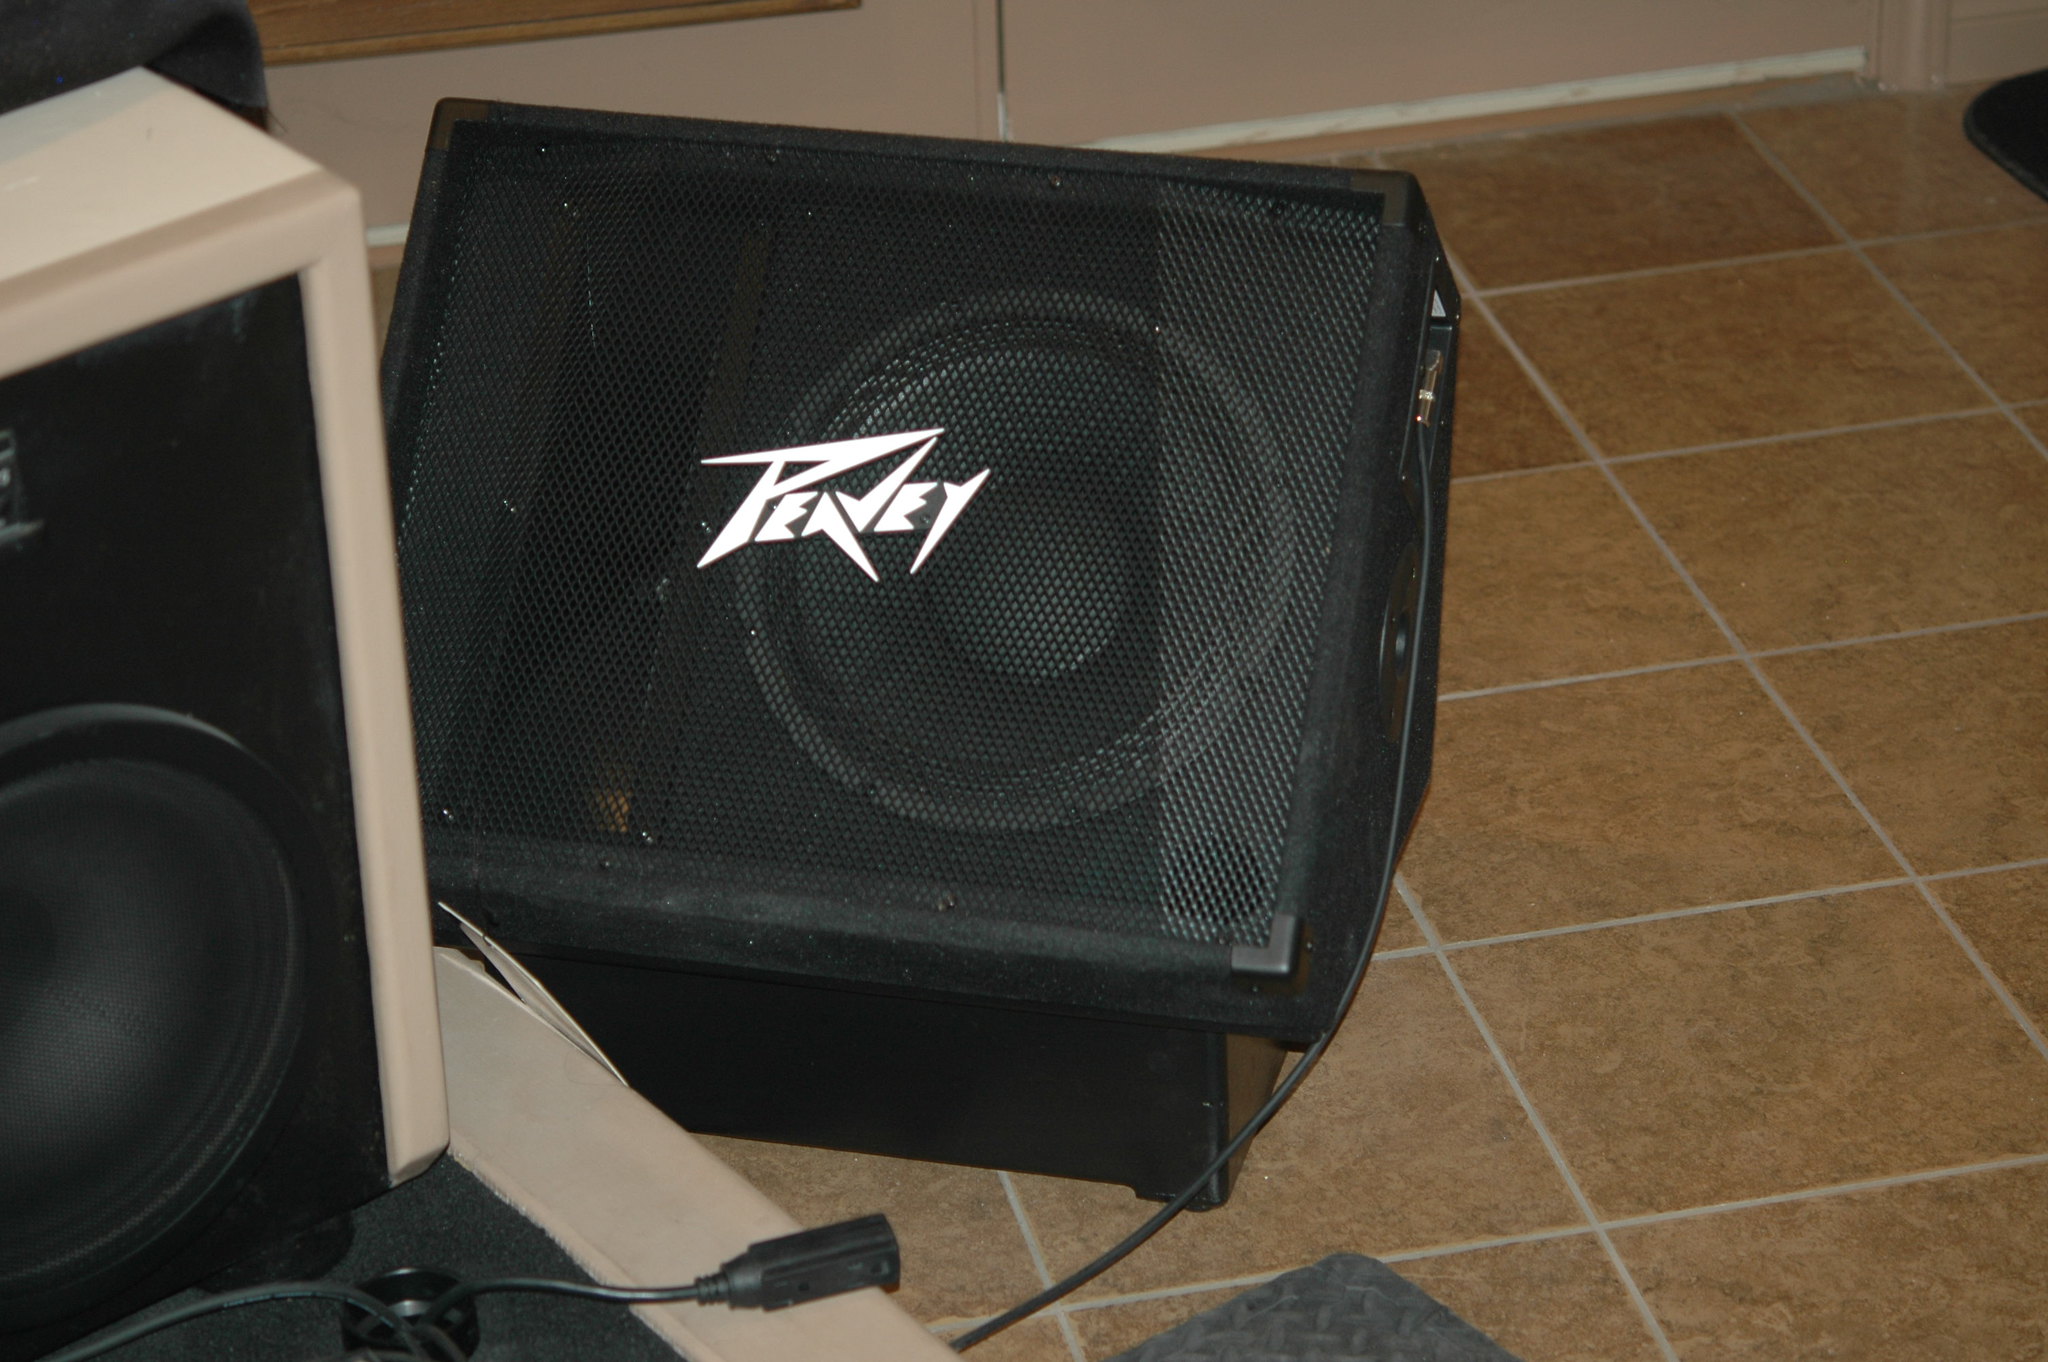 DSC_2365 DSC_2365 by Larry Madsen, on Flickr |
|


