|
|
Post by Peegoo 🏁 on Apr 20, 2021 18:50:18 GMT -5
I decided to try making a guitar with no power tools, and I wanted it to be sorta 'rustic' looking. So I planed the sides of five 17" pieces of pine 2x4 and glued 'em up. I scrubbed both sides with a hand plane and stapled a length of 60-grit used sanding belt (don't throw those belts away!) to a 20" piece of 2x4 and sanded it flat on both sides. I traced around the '53 template with a pencil in a small washer to give me some fudge room when I saw out the shape with a coping saw.  The top of the body will be a 5/16" overlay of skanky wood from a forklift pallet. There's spalted maple, mahogany, and some other U/I stuff that I'm gluing up and will stain with food color to resemble a faded Texas state flag. This is the idea...but I'm not going to install a pickguard: 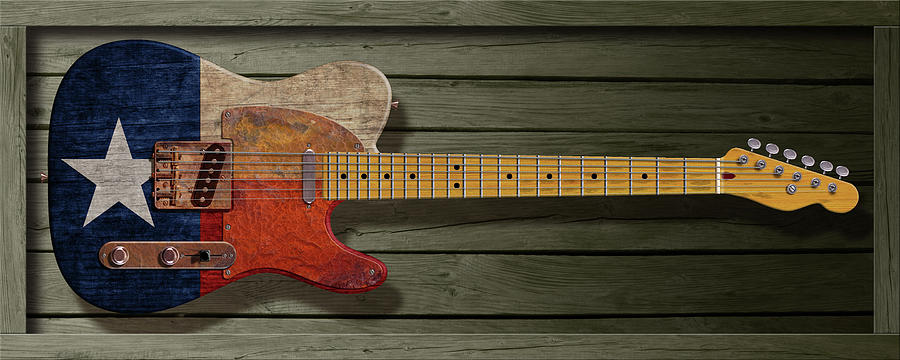 I'm using a small router plane here to cut a star-shaped recess for the white star in the blue field behind where the bridge will be. If you've never used a router plane, it is basically a small sharp chisel mounted to a base for depth control. These work really great for this kind of stuff.  I think I'll use ash for the star because it has interesting grain. Haven't decided if it will be a one-piece inlay or several...these things just sort of develop as I make progress. The pickups I'm using are a pair of real-deal vintage Rowe (DeArmond) gold foils. I may make the bridge rather than use a commercial Tele bridge. It may be something really stupid simple that I've been wanting to try for a long time. Jury's still out on that too. This is a disease that has no cure... |
|
|
|
Post by Peegoo 🏁 on Apr 21, 2021 13:15:34 GMT -5
Made a little progress on this today. Here's the top glued up and cut out.  Here's the back, same same.  Nothing like a little pressure. Now we wait for the glue to cure.  |
|
|
|
Post by Auf Kiltre on Apr 21, 2021 13:27:32 GMT -5
Oh man, I want it. C'mon man, I'm a Texan now.
Yer skills astound me.
|
|
|
|
Post by Leftee on Apr 21, 2021 13:48:49 GMT -5
I’ll just sit over here and take notes. 😁
|
|
|
|
Post by Peegoo 🏁 on Apr 21, 2021 13:51:26 GMT -5
Oh, it is FAR from done. Still plenty of opportunities to screw it up  |
|
|
|
Post by Leftee on Apr 21, 2021 14:10:10 GMT -5
Don't forget the pecan pie breaks.
|
|
|
|
Post by Auf Kiltre on Apr 21, 2021 14:11:22 GMT -5
I think it needs the Geno brand burned into the headstock.
|
|
|
|
Post by Peegoo 🏁 on Apr 21, 2021 16:56:30 GMT -5
I think it needs the Geno brand burned into the headstock. That's a good idea. I made a hot brand from steel wire for this leather name patch on a shop apron I made a while back.  |
|
|
|
Post by funkykikuchiyo on Apr 21, 2021 21:09:20 GMT -5
I love that router plane! Those suckers have gotten kinda scarce in covid era. I'm not sure I recognize that particular one, but it looks nice and sturdy.
Do you have a bit and brace set? May want to keep an eye out for one when it comes time for some of the other routes, like the pickups and neck pocket. Also, get those chisels nice and sharp!
|
|
|
|
Post by Peegoo 🏁 on Apr 21, 2021 21:28:45 GMT -5
I love that router plane! Those suckers have gotten kinda scarce in covid era. I'm not sure I recognize that particular one, but it looks nice and sturdy. Do you have a bit and brace set? May want to keep an eye out for one when it comes time for some of the other routes, like the pickups and neck pocket. Also, get those chisels nice and sharp! These router planes have been available for years from several vendors; the quality is extremely good (stainless steel base and HSS chisel). Shop around. Here's the same one, on Amazon: www.amazon.com/Cowryman-Router-Plane-Handheld-Woodworking/dp/B074LHXC44/ref=sr_1_2There are generally two types of router planes, those with an angled chisel, and those with a vertical chisel that has a 90-degree bend in the cutting end. I prefer the angled type because it puts very little of the chisel below the base plate. Gives you much more room for detailed work. And these are a lot easier to sharpen too. I do have a bit and brace set (handed down to me, Irwin brand with lead screws). I love using it. It's a joy to use because I keep them razor sharp and they pull themselves through the hardest wood like a knife through soft cheese. |
|
Wrnchbndr
Wholenote

Posts: 353
Formerly Known As: WRNCHBNDR
|
Post by Wrnchbndr on Apr 22, 2021 22:45:56 GMT -5
Diggin the work.
|
|
|
|
Post by Peegoo 🏁 on Apr 23, 2021 0:59:41 GMT -5
Hey Mark! I Hope you're doing well, brother. I used a Japanese pull saw to slice the star in half because I cut it out of a slab of ash that was about 5/16" thick. So I deli sliced off a 1/8" thick piece of salami to inlay into the recess. I got it glued in and scrubbed it with a block plane to get it almost flush with the top, and followed with the 60-grit paper on the block to level everything out.    I also sanded the perimeter using 60-grit stapled to blocks and taped to sections of PVC pipe. It's all nice and smooth. Next step is to cut the recesses for the pickups; the'll be about 1/2" deep because these gold foils are very thin. The neck pickup is 4.9K and the bridge pickup is 5.7K. I'll be using a Wilkinson cut bridge with three brass saddles configured for top loading. Gotta do the neck pocket too.  I'm going to rear load this so there's no control plate on the front, and there will be no pickguard. I also plan on doing an SG-like bevel around the perimeter instead of the usual 3/16 radius. I've never seen a Tele with a bevel, but I'm sure somebody has done it by now. This will not be as rustic lookin' as I assumed it would be. |
|
|
|
Post by Leftee on Apr 23, 2021 6:31:44 GMT -5
Very excellent work!
Those Walnut bodies I’m hooked on have 1/2” rounded edges. I thought it was weird until I got that first one done.
|
|
|
|
Post by Peegoo 🏁 on Apr 23, 2021 8:16:06 GMT -5
Yeah man. I did one last year with a 3/4" radius and it felt really nice.
Sort of like a 1980s Ibanez 540 model; those had a really smooth "bar o' soap" feel about them.
|
|
|
|
Post by funkykikuchiyo on Apr 23, 2021 9:51:29 GMT -5
I love the idea of the bevel - it leans into hand tools better than a round over, which is so rotary tool specific. I mean, I guess you could make a rounded scraper, or make yourself crazy with a beading plane, but that sounds tedious. I love the idea of getting a card scraper with a good edge on it and going for it.
|
|
|
|
Post by Peegoo 🏁 on Apr 23, 2021 10:12:43 GMT -5
Card scraper? That's too slow. I'm impatient.
It's gonna be a rasp and sandpaper!
And tennis elbow...probably.
|
|
|
|
Post by Auf Kiltre on Apr 23, 2021 14:51:23 GMT -5
That is gonna be a beaut. What sort of finish will you be applying?
|
|
|
|
Post by Peegoo 🏁 on Apr 23, 2021 16:51:36 GMT -5
Haven't decided...either Danish oil or clear satin. I want it to look like bare wood. I got the recesses done today; I've never used a router plane for stuff this deep. It takes a while because you cannot take big bites. The bevel around the perimeter is done too. I think I'll dowel the neck screw holes and recess the neck plate because this pine is really soft; the spring clamps left dents in the back. That will keep the wood from compressing.  And change of plans: rather than a cut Tele bridge, it's going to be an ABR-1 Tuneomatic bridge because it covers up very little of the top. I'll make some string anchors from brass rod...or some other stuff...dunno yet. The neck pocket is angled backwards about 4 degrees since I'm going with an ABR-1. I've never done an angled neck on a Fender-style build, so I figured this would be a good time to try it. The neck is a one-piece bubinga Warmoth '59 carve with a 50's Strat headstock and 6100 SS fret wire. Yeah, I'm copping out, but I no longer have a full-up wood shop to do necks. |
|
|
|
Post by Peegoo 🏁 on Apr 24, 2021 19:32:53 GMT -5
So change #3... I was going to use a TOM bridge, so I got to making string anchors from six heavy brass round-head screws. My idea was to extend the slot through the screw head on each side. This allows the string ball to anchor under the back of the screw, and string tension holds it in place. These anchors would screw directly into the wood behind the bridge and they would each be height adjustable. I made the cuts on the metal-cutting band saw, with the screw driven into a stick of wood to hold it for the cut. Here are some pics.   Here's a shot that shows how the ball catches under the screw head. The string continues through the slot toward the bridge.  After I got these done and started laying out their locations on the body behind the bridge, I decided it would take away from the look of the guitar, so I'm now going with a wrap-tail bridge...the type on the Les Paul Junior. So back to the drawing board to lay out the location for that and drill holes for the threaded sleeves.  I also drilled 1/2" holes and doweled the screw holes through the body because the back of the body is soft pine. The poplar dowels prevent the wood compressing under the neck plate. I used a flush cutting saw to trim off the excess.  Next step was to chisel a recess where the neck plate is going, and shape it all nice and smooth with rifflers and sandpaper.  See that screw-up on the lower right screw hole? I had a 3/16" drill in my Millers Falls eggbeater and the drill wandered off into the rhubarb. I checked it and it was dull as a butter knife, so I touched it up on the grinder and it was back to cutting accurately. This is how the necck plate will look when it's screwed on. The plate completely covers the ends of the dowels. See that ding in the wood near the cutaway? The spring clamps left a few of those in the soft pine. I'm leaving 'em there; this guitar is going to get banged up pretty easily anyway.  |
|
|
|
Post by Peegoo 🏁 on Apr 25, 2021 8:39:06 GMT -5
Color is on; I used acrylic-based ink designed for airbrush work. I'll follow this with a rubdown of dark stain over the entire body, followed by a little sanding with 220 to flatten out the pips that pop up and weather it a little. Then comes finish...either Danish oil or a satin clear. I'll drill for the controls when I wire it all up.  |
|
|
|
Post by funkykikuchiyo on Apr 25, 2021 9:05:34 GMT -5
The dent will likely steam out, but since it is a hand tool only thing, you might have to start a fire to do that properly. Get the marshmallows!
I was wondering how you were going to do a hand tool truss rod cavity - I think they've been done by rotary tools since the invention of truss rods. Router plane or mortising chisel both sound tedious, but fun to watch when I'm on the other side of the country! Fret slots wouldn't be too bad without rotary tools if you stuck with smaller fret wire. I've worked on some old Gibsons where it seemed like the radius was likely done with a bench plane. It wasn't a "radius" so much as it was a crown with a flat spot on top and two flat spots on the side, vaguely blended into a roundish shape.
I like the idea of swapping out the bridge. I suspect lightweight Gibson style is the better complement for the gold foil, but you just never know.
Were the final passes in the neck pocket done with the router plane or by sanding? I imagine there wouldn't be enough body meat to do it, but maybe I'm wrong; did you use any kind of reference shelf for the bed of the plane?
|
|
|
|
Post by Auf Kiltre on Apr 25, 2021 9:06:04 GMT -5
Looking good. Have you ever tried shellac as a finish coat? I know some use it as a base coat and think it's too soft a finish for electric guitar. But I did my Tele exclusively with some Wellermart flakes/denatured alcohol and think it came out well.
|
|
|
|
Post by Leftee on Apr 25, 2021 9:24:28 GMT -5
This is looking great!
|
|
|
|
Post by Peegoo 🏁 on Apr 25, 2021 12:04:30 GMT -5
Cheers, y'all. I used a chisel and sandpaper to get to the final neck pocket floor. I had a bevel gauge set to the 4 degrees I needed for the neck angle, and I checked it as I worked the wood down. I'm not making the neck because I no longer have the space to do that. I know it can be done, but I have several necks hanging around doing nothing, so I pulled out a bubinga Warmoth for the task. I thought about steaming out those dings with a soldering stick, but naaahhhh...this is not supposed to be pristine anyway. I've used shellac as a finish coat, but I'm not totally happy with how it feels and how it wears. I do use it often as a sanding sealer and primer. The dark stain is on...once that dries for a few days I'll shoot clear satin and start turning it into a noisemaker. The blue has a nice faded denim look to it. Came out better than I expected.  |
|
|
|
Post by Riff Twang on Apr 25, 2021 14:25:27 GMT -5
Very nice. Did you guesstimate where to place the pickups or is there some formulation involved?
|
|
|
|
Post by Peegoo 🏁 on Apr 25, 2021 17:15:48 GMT -5
Hey Riff Twang, The formula for the pickups' locations came from eyeballing other guitars I have in the barn, as well as this helpful diagram that shows string harmonic nodes and their relationships to scale length and pickup locations in common electric guitars.  |
|
|
|
Post by Riff Twang on Apr 26, 2021 1:05:22 GMT -5
Thanks Peegoo. I knew about the nodes, hence my question. The diagram is a good reference point.
|
|
|
|
Post by Peegoo 🏁 on Apr 26, 2021 8:19:14 GMT -5
Here's a mockup of the major parts. Looks like they will all play nice with each other.  |
|
woody
Wholenote
Posts: 245
|
Post by woody on Apr 26, 2021 8:42:41 GMT -5
Dang, Mr.’Goo! Just dang!
|
|
|
|
Post by funkykikuchiyo on Apr 26, 2021 9:37:53 GMT -5
I like that combination of colors!
I always liked the rustic look in furniture and home decor, but it doesn't get pulled off in guitars often. I remember a thread in the acoustic board a while back about a Martin where they went for that aesthetic and I was in the minority for liking it - mainly because it didn't look like a "relic", it just has the rustic look, which I like.
It makes me wish the aged bronze look was more readily available in hardware.
We had someone's home built Warmoth in the shop last week, and it was SO gaudy. I asked my co-worker to please work on it when I wasn't around so I wouldn't have to work on it. It had a real stripes with polka dots and paisley vibe to it. This is a good palette cleanser (no pun intended).
|
|


